


Microsoft Planner is a project management application that helps you organize and track tasks for group and personal projects. This article focuses on how you might use a plan for group projects, but the same concepts can apply to personal projects, too. Planner is part of the Microsoft 365 suite of applications and integrates with other apps like Outlook, Teams, and To Do. Planner lets you create plans, assign tasks, set due dates, monitor progress, and collaborate with your team members. Planner is ideal for managing projects that involve multiple people, tasks, and deadlines, such as a class assignment, a research project, or a work presentation.
Ways to use Microsoft Planner
You can use Microsoft Planner in two different ways: as an integrated component of a team in Microsoft Teams or as a standalone project plan through the Planner application. We will primarily focus on using Planner as a standalone application and not integrated with Microsoft Teams. We will discuss the integration with Microsoft Teams more in-depth in an upcoming article called "Managing and creating Tasks in Microsoft Teams and the Planner app."
Is there an app for that?
As we discussed in the introduction of this series, there is no desktop application for Microsoft Planner. There are Android and iOS applications as well as an integration with Microsoft Teams through the Planner app (formerly Tasks by Planner and To Do). For this article, we will use the online version of Microsoft Planner since the experience of using the web application is remarkably similar to using the Planner app within Microsoft Teams. The Planner web application is accessible from Microsoft 365 at IU and from the Microsoft 365 desktop application.
- To access Microsoft at IU, in a web browser,
Navigate to https://microsoft.iu.edu and login. - To launch Planner, from the Microsoft 365 application,
Click the App launcher button, Click the Planner icon
When Microsoft Planner loads, you'll see the Planner Hub. The Hub gives you a snapshot of your plans. If you'd like a more detailed view of a plan, you can pin that plan.
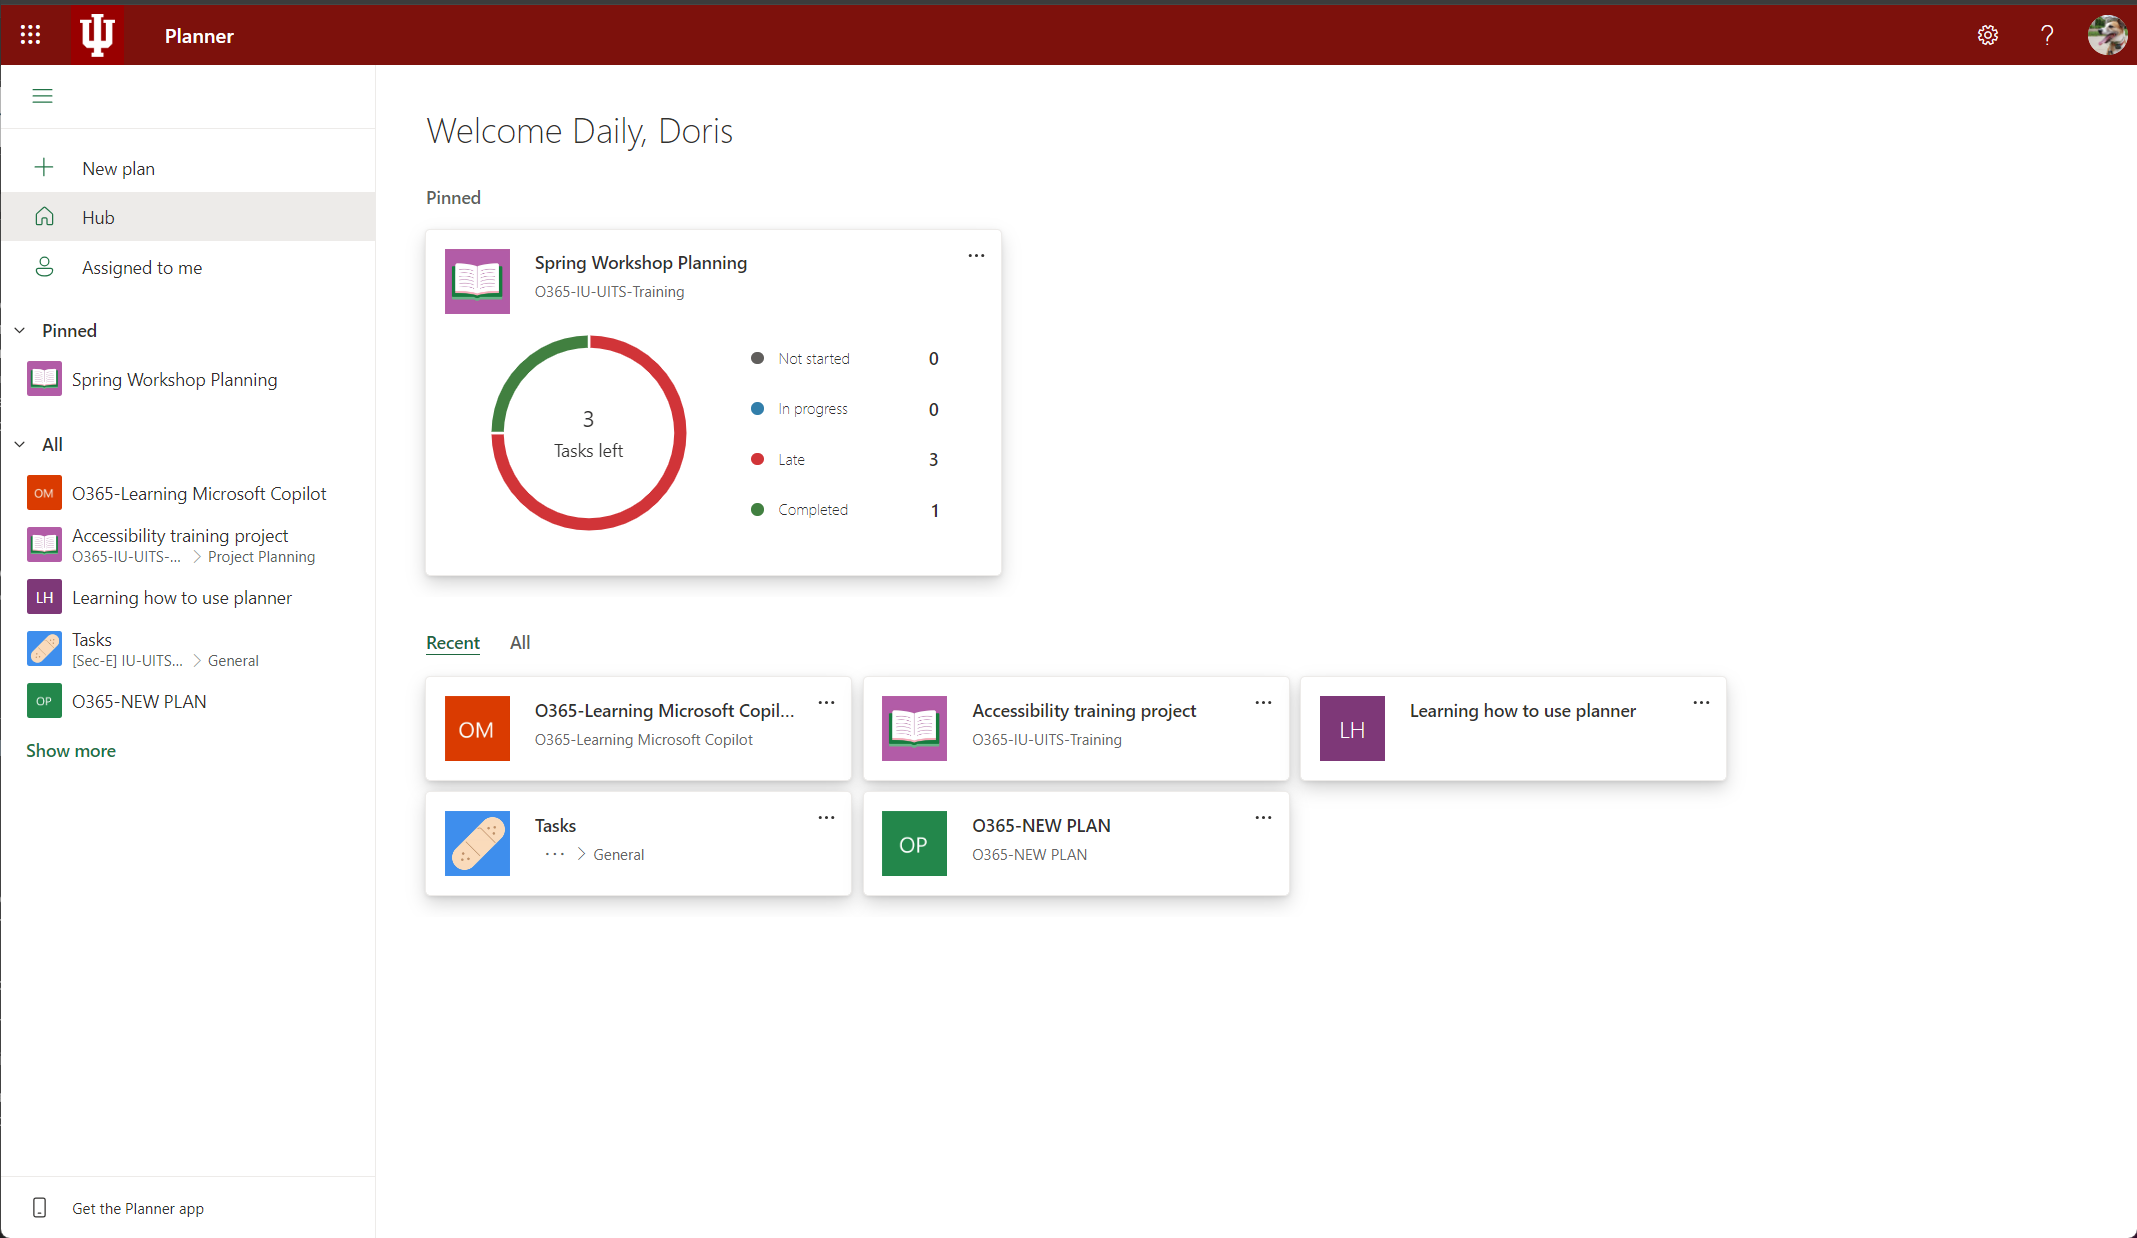
NOTE: This is a training account, so these plans aren't actively in use and will seem empty.
You can see all your plans by clicking Show more in the sidebar or launch a recent or pinned plan by clicking the plan from the Hub. Let's create a standalone plan.
How to create a standalone plan in Microsoft Planner
Standalone plans are useful for planning your personal projects, projects with people who don't all belong to a specific team, or if you'd like to make a plan open to the public.
To create a plan in Planner, follow these steps:
- To create a new plan,
Click New plan in the Hub sidebar.
You will see a dialog presenting many different starting points for our plan. You can choose any of these that seem to fit your project to help make the plan creation process easier.
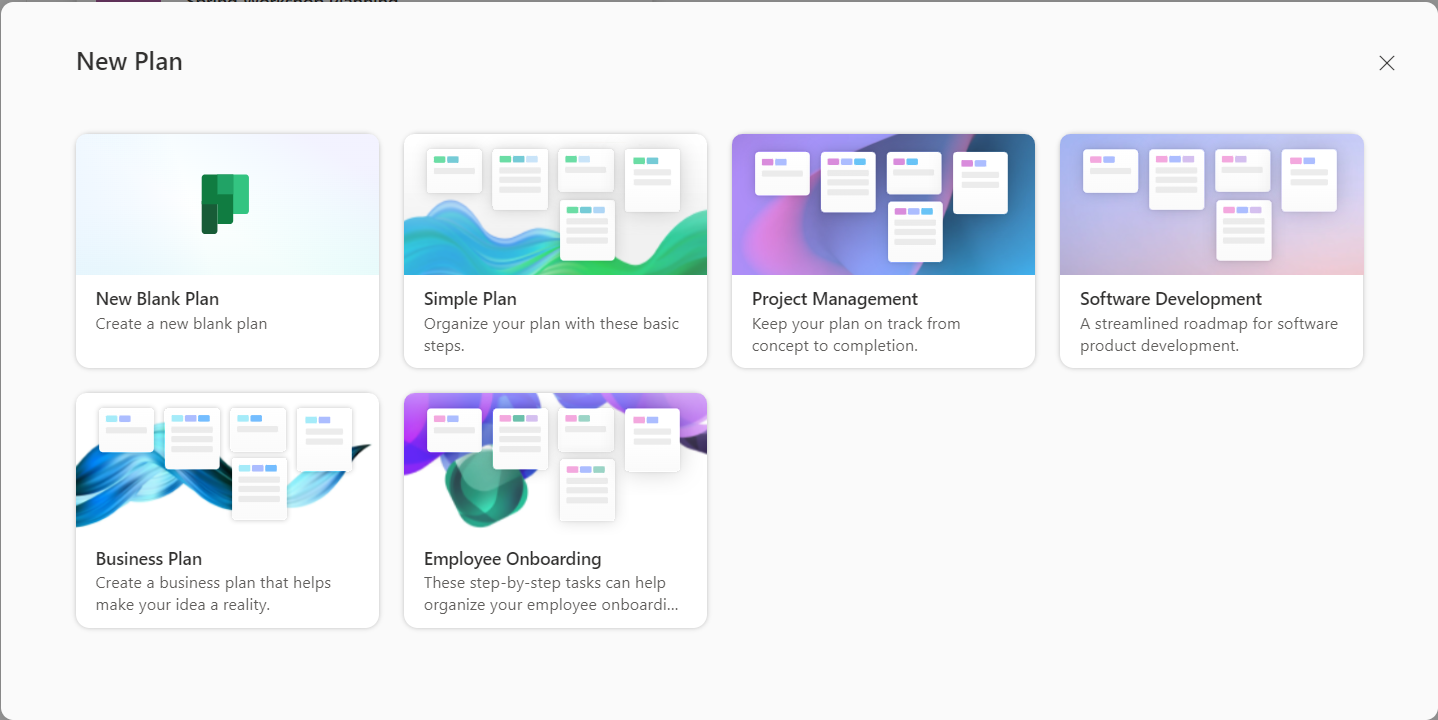
- To select a plan template,
Click a plan template
This will open a dialog box where you can enter the details of your plan:
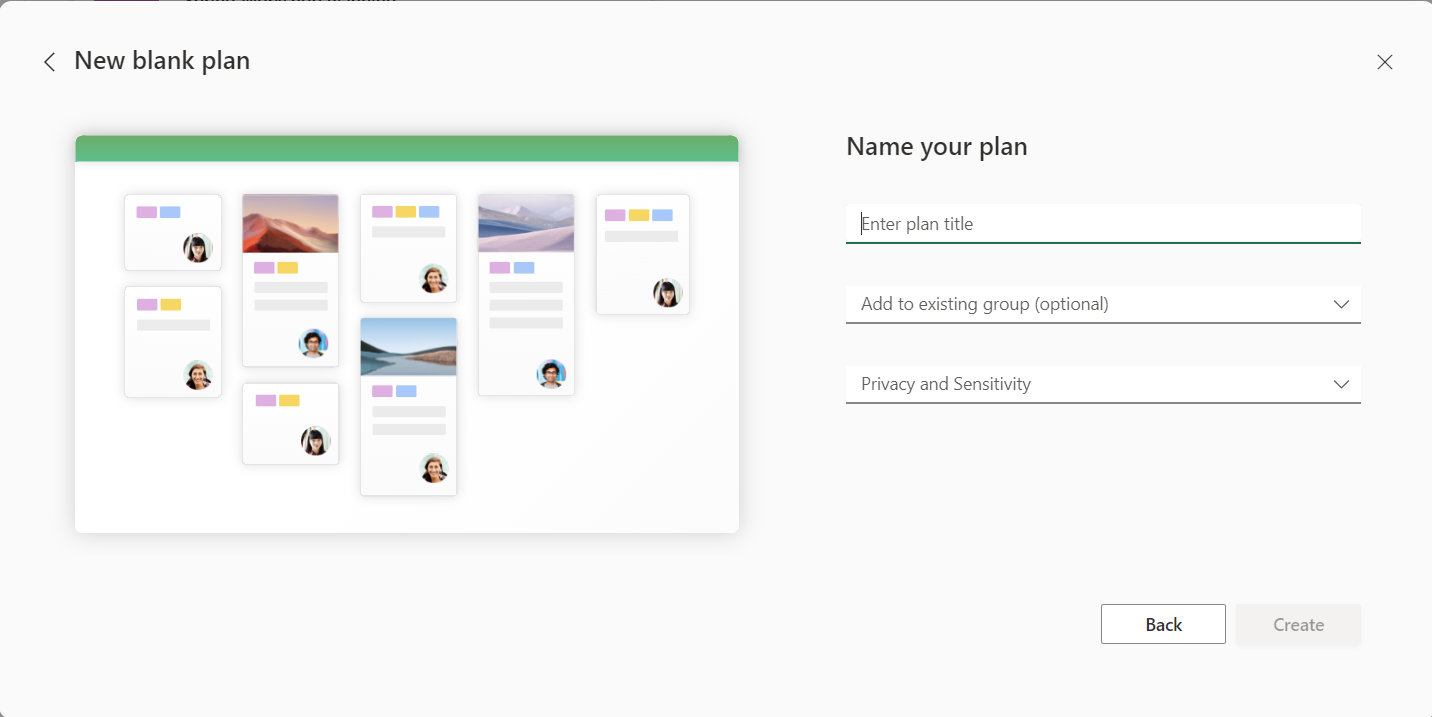
- To give your plan a title, in the Enter plan title field,
Type a brief title
Access to standalone plans is controlled by a Microsoft 365 group. If you have an existing group, you can use it to control access, or you can decide not to select a group and let Planner make one for you. You can also make a plan available to all members of an existing team within Microsoft Teams. Public plans are available to everyone with an Indiana University Microsoft 365 account.
- To create a standalone plan,
Don't add a value to the Add to existing group (optional) field
The Privacy and Sensitivity dropdown allows you to choose whether your plan is public or private. The default is to create a private plan. If you would like to create a public plan, set the Privacy and Sensitivity field value to Public. We will create a private plan in this example.
- To create your plan,
Click Create plan
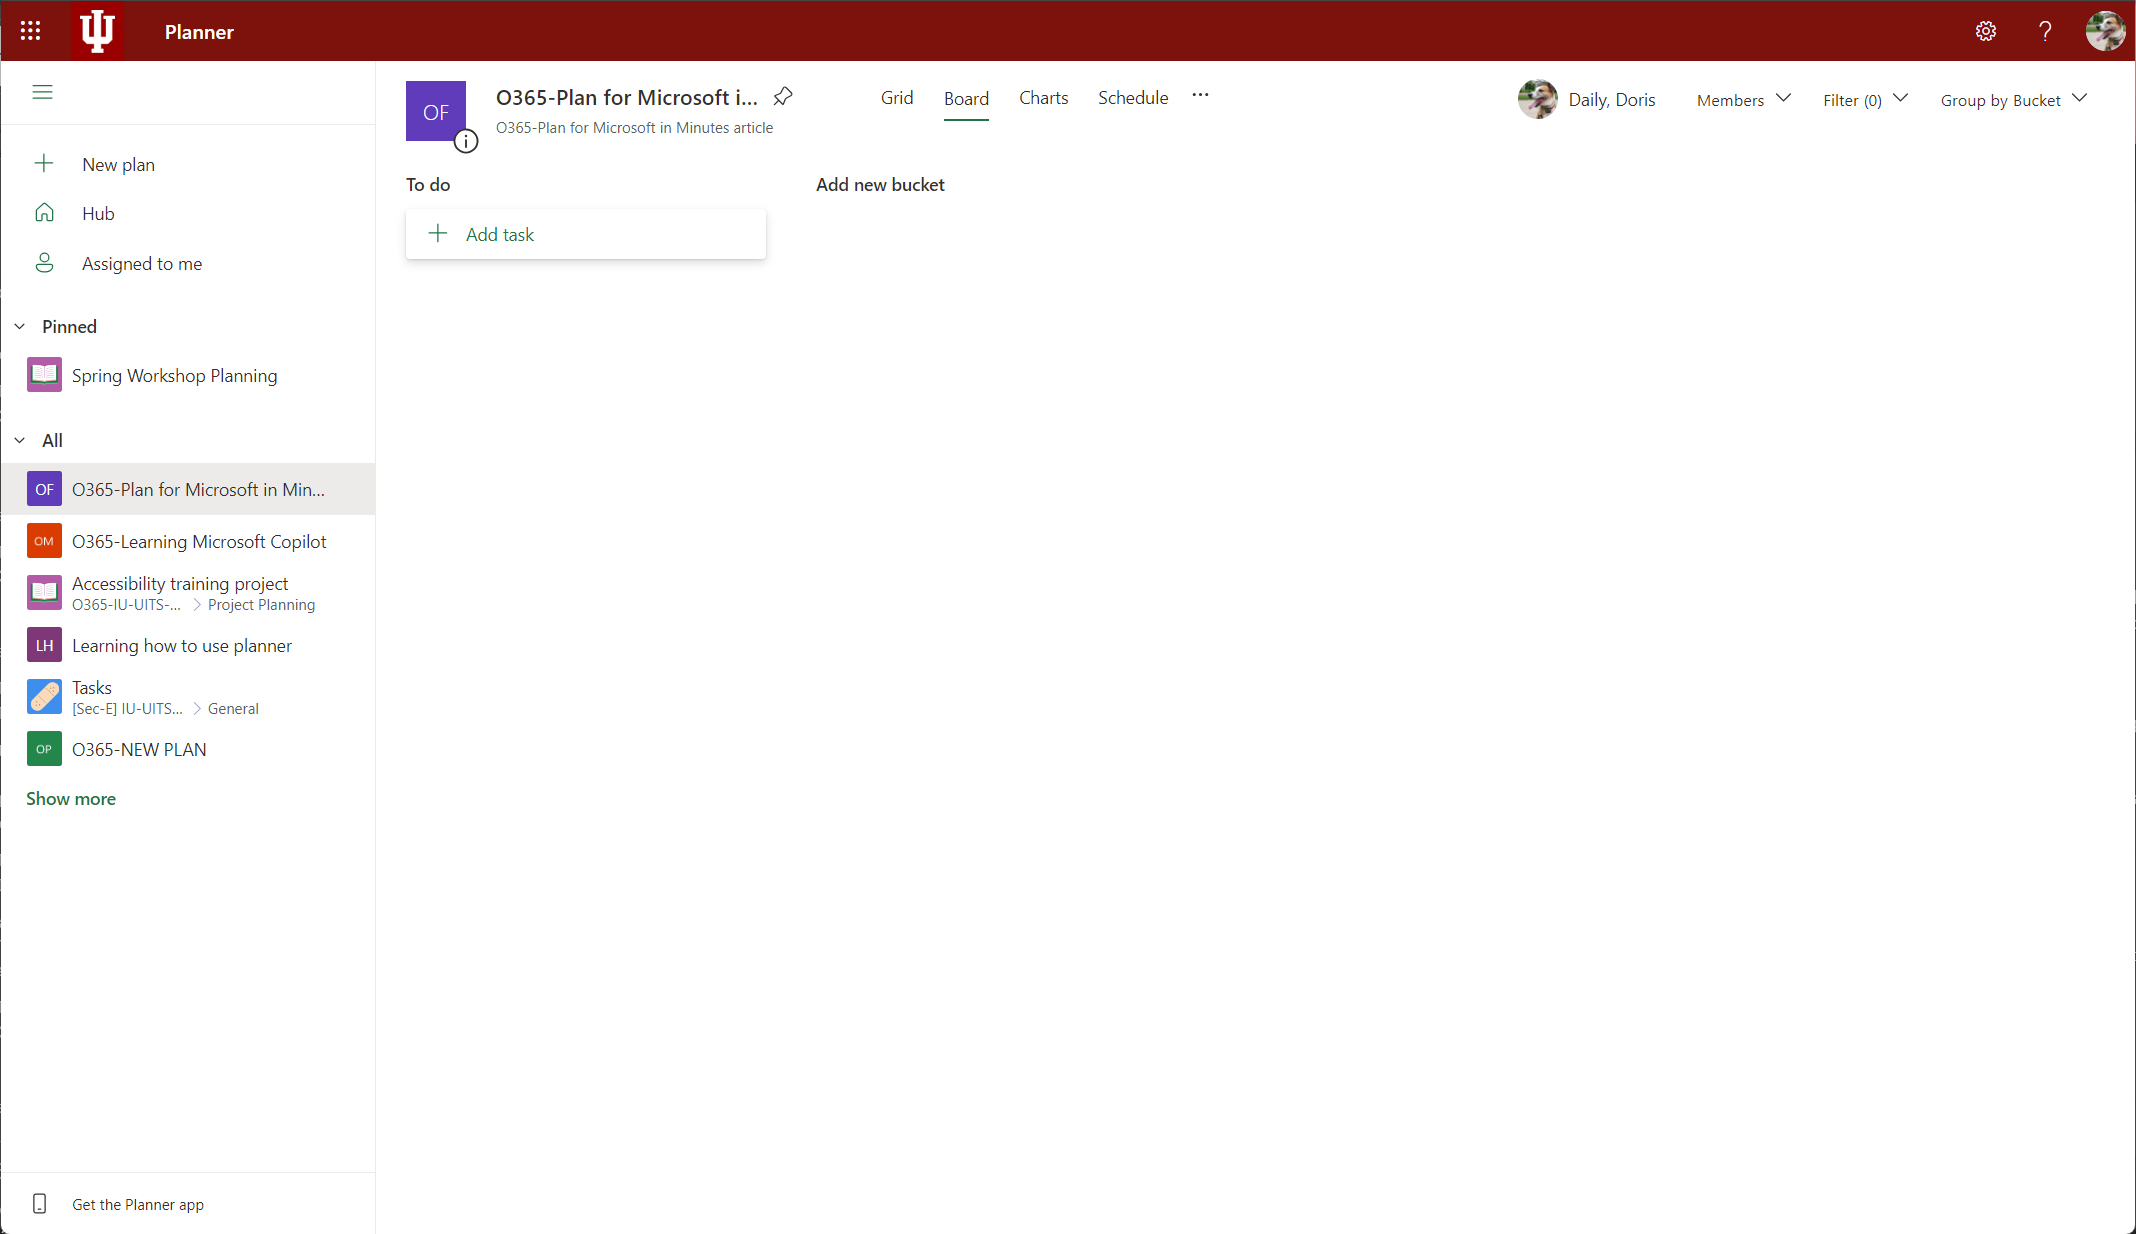
This will take you to the main page of your plan, where you can start adding tasks and members.
Understanding plan structure in Microsoft Planner
Once you have a plan, it's important to understand how Planner organizes tasks. Unlike Microsoft To Do (we took a brief look at To Do in Using Microsoft Outlook for task management), Planner doesn't use lists to organize tasks. Instead, task cards are organized in buckets. Another difference between Outlook/To Do and Planner is that secondary organization in Planner isn't tied to your Outlook categories. Instead, you can use labels to the same effect.
Using buckets
Buckets are used to organize tasks by a common theme, such as a project phase, the responsible department, a specific location, or the kind of work involved (e.g., testing, rollout, copy editing, etc.). You can also use buckets to keep track of task status if you need a more robust means than the built-in statuses of not started, in progress, and completed.
Before you begin building buckets, it's important to consider the entire project, and the big picture:
- Does your project have several phases? If so, consider creating a bucket for each phase.
- Does your project involve multiple groups of people? If so, consider creating a bucket for each group.
- Are some tasks performed in a particular location or building? If so, consider making a bucket for each location.
Take the time to consider all the different ways that you could group tasks together in your plan and then pick the most important grouping for the project. For example, if identifying project phases is more important than what department is responsible for a group of tasks, create buckets for project phases instead of departments. Don't immediately discard the other groups, though. We'll talk about what to do with them next.
A task can only be in a single bucket at a time so it's important to pick one theme for your buckets and stick to it.
Creating buckets
Now that you've identified your bucket theme, let's create all the buckets we need to get started. By default, if you chose to create a blank plan, Planner creates a To Do bucket. You can rename or delete this bucket as you wish. Remember, you can add more buckets throughout the life of the project.
- To create a bucket,
Click Add new bucket, type the name of the bucket, press Enter - To rename a bucket,
Point to the bucket name, click the More options button (…), click Rename, type the new name, press Enter.
Using labels
Labels can be added to tasks to help differentiate them further. You created your buckets to match the most important task grouping you could imagine. Your labels can match all the other groupings you decided weren't the most important. You can create up to 25 labels, each with their own color. A task can be assigned multiple labels.
Creating labels
Since we don't have a task yet, we can't modify a label. In the next section, once we have a task, we can modify the names of our labels. By default, they're named after their color, e.g., Red, Blue, etc.
How to create and assign tasks in Planner
Now that we have our buckets organized, let's start adding some tasks.
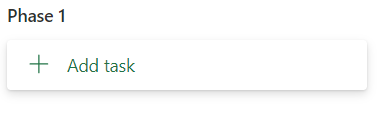
- To add a task to a particular bucket, under the bucket name,
Click + Add task
This opens the quick-add dialog within the bucket column:
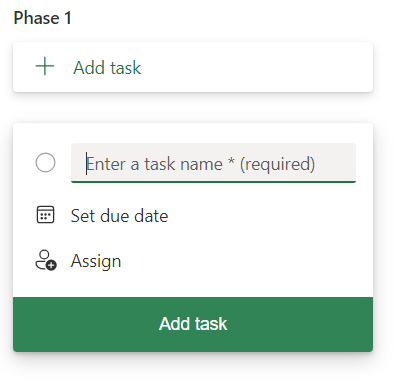
Simply give your task a name (required), a due date (optional), and an assignee (optional).
- To create the task,
Click the Add task button
The task is created:

Adding details to a task in Planner
Once a task is created, you can add details to the task to help you and your collaborators complete the task and keep the project on track without missing any details.
- To add details to a task,
Click the task card
The task is opened in its detailed view:
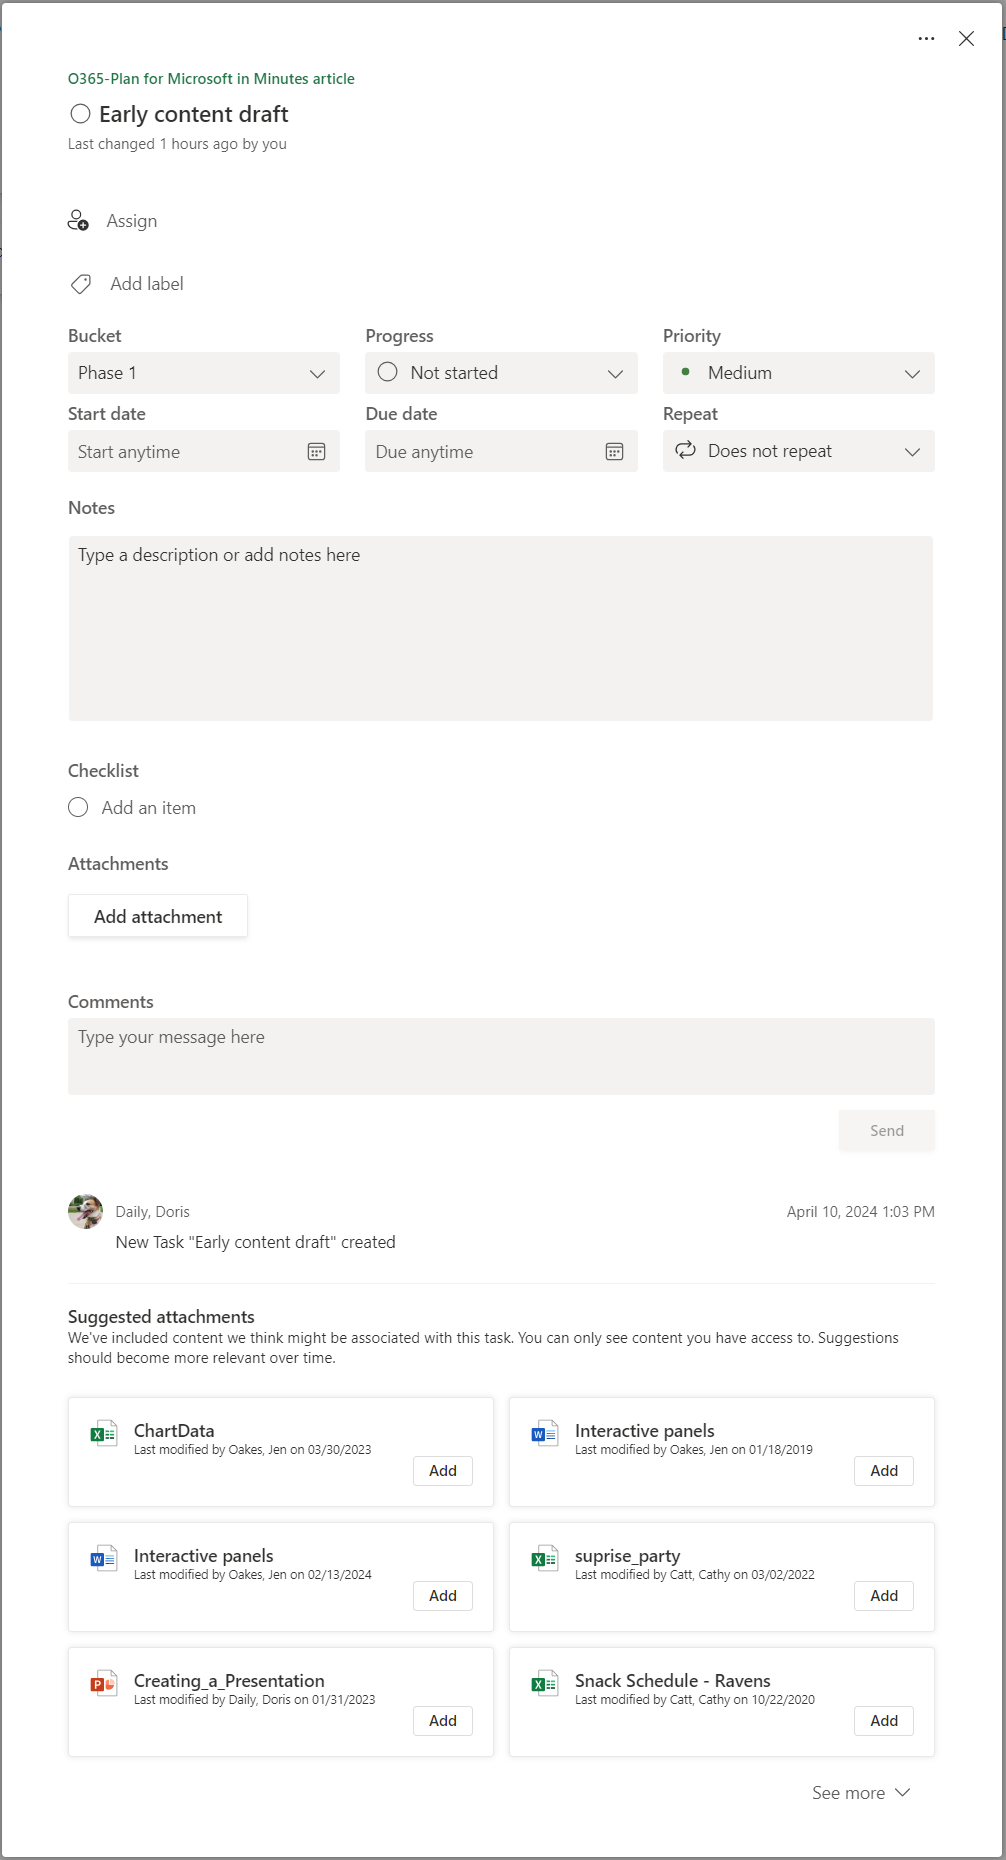
From this view, you can:
- Rename the task by clicking on the task name.
- Assign the task to a person or group of people by clicking Assign. This is tied to the IU global address list, but you can also assign tasks to any member of the plan.
- Add labels to the task by clicking Add label.
- To edit a label, open the label dropdown and click the edit pencil next to the label you'd like to edit.
- Change the task's bucket in the Bucket dropdown list.
- Set the progress flag using the Progress dropdown list. Options are Not started, In progress, Completed.
- Set the priority of the task in the Priority Options are Low, Medium, Important, Urgent.
- Schedule the task to start on a particular date in the Start date
- Schedule the due date for the task in the Due date
- Set the recurrence interval for the task in the Repeat
- Add a description to describe the task with more detail than the task's title in the Notes
- Add a series of subtasks related to this task in the Checklist
- You can choose to show a task checklist on the card on the plan board by checking the Show on card
- Attach files related to the task in the Attachments
- You can choose to show an attachment on the card on the plan board by checking the Show on card
- Comment on the task in the Comments
- See and select suggested attachments from within Microsoft 365.
Once you've filled out the details for a particular task, you will see some additional content appear on the card representing the values of the fields for the task:
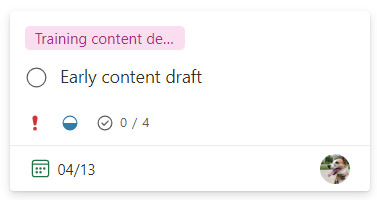
One of the most powerful capabilities of Planner is the ability to organize your view tasks based on the values in fields like Priority, Assign, Due date, Progress, etc. Using these fields to keep the status of your tasks up to date is also a great way to communicate the status of your work to a project manager and the rest of your project team. Remember the pinned plan from the Hub? That chart is generated based on activity on tasks within Planner.
When you finish modifying the fields for a task, simply click the X in the upper right corner or click the background away from the card to close the task.
Adding members to a plan
Once you've created your plan, it's important to add your team. When we explore using Planner in Microsoft Teams, we'll talk about how to add a plan to a team, but for a standalone plan, we can add anyone we'd like to the plan.
- To add a plan member, in the top right of the screen,
Click the Members menu, type the member's name, username, or email, press Enter

NOTE: This menu is tied to the IU global address list. To invite non-IU members, simply type their Microsoft account email address.
Viewing your tasks with purpose in Planner
Once your project is underway, it's important to be able to navigate Planner to keep tabs on progress, identify stuck tasks, ease the load of overburdened team members, and see your plan in a calendar view (that can be integrated into Microsoft Outlook). Planner also provides several filtering and grouping options to help you get a good picture of your project's progress.
Using Planner views
Let's explore the Planner views first:

- Grid view: This shows every task in a single list similar to how tasks appear in Microsoft To Do. Grid view has additional fields that give you a snapshot of the values of fields like priority, assignment, due date, etc., for every task in your plan. This view excels at adding multiple tasks with details quickly.
- Board view: This is the default view that shows your tasks in columns based on your buckets. You can drag and drop tasks between buckets, edit task details, and filter tasks by labels, assignments, or progress.
- Charts view: This view shows you the statistics and charts of your plan, such as the number of tasks completed, not started, or in progress, the distribution of tasks by bucket, label, or assignment, and the status of each member on your plan.
- Schedule view: This view shows you the calendar of your plan, where you can see the start and due dates of your tasks, create new tasks, and drag and drop tasks to change their dates.
- To add your plan to your Outlook calendar, click the three dots next to the view tabs and click Add plan to Outlook calendar. This option will add the plan as an additional calendar in your Outlook calendar app.
Using Planner filters
Once you've determined the view that is most optimal to survey your tasks, you can further limit what you see by using the filters.
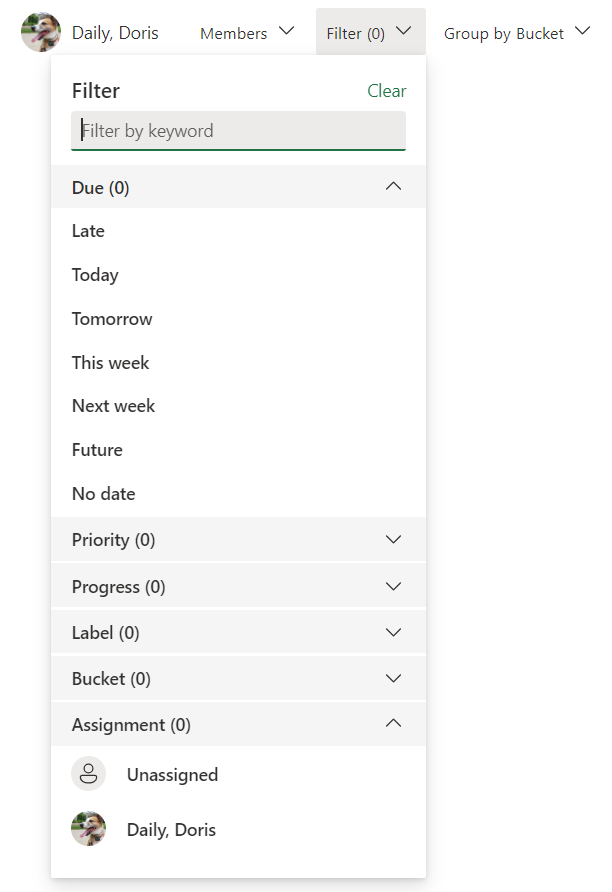
Filters allow you to define properties of tasks you'd like to see in your current view. For example, if you'd like to only see late tasks, select the Late option in the filters menu. Other useful filters include filtering by assignment, bucket, label, etc. You can even use the Filter menu to filter by a keyword that appears anywhere on the task card.
Grouping tasks in Planner
The last way you can customize your view is by determining how your tasks are grouped. By default, tasks are grouped by Bucket. You can change that grouping by clicking the Group by Bucket menu:
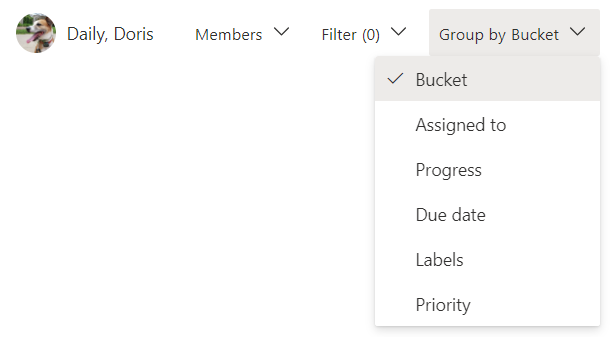
NOTE: Grouping isn't available in Grid view.
This rearranges your tasks into columns based on the option you choose. For example, you can group tasks in columns by progress to see what tasks haven't been started vs. which tasks are in progress or you can group by Assigned to for a quick glimpse at a plan member's task load to easily redistribute the work.
Deleting a plan
If you've been following along, you now have a plan you may not use for another purpose. There are also situations where you may want to delete a plan you created because the project is cancelled, completed, or you were just trying things out and want to start fresh. In any case, you can easily delete a plan from the Plan settings.
- To open the plan's settings, next to the view tabs,
Click More. Navigate to other pages related to this plan. (...), Click Plan settings
From here, you can do things like change the plan name or access group, modify your notification settings, and even change the plan background.
- To delete a plan, on the General tab of Plan settings, at the very bottom,
Click Delete this plan
To become a master project manager using Microsoft Planner, experiment with various combinations of views, filters, and grouping so you can quickly see the tasks you need to see when you need to make decisions and give status updates to stakeholders. In all these views, filters, and groupings, you can view and modify any task.
Microsoft Planner is a powerful and easy-to-use project management application that helps you organize and track tasks for group and personal projects. You can create plans, assign tasks, set due dates, monitor progress, and collaborate with your team members.
What's next?
We've already covered a lot of ground, but there's still a lot to learn to become a tasks master in Microsoft 365!
So far in this series:
- We looked at the Microsoft 365 task system as a whole in An Introduction to Microsoft 365 Tasks.
- We looked at ways to help you keep track of important tasks from your email using email flagging, due dates, and reminders in Outlook and Microsoft To Do in Using Microsoft Outlook for task management.
- This article: We explored the basic skills you need to use Microsoft Planner to manage group projects efficiently and effectively in Planning group projects with Microsoft Planner.
In the final three articles:
- We will look at how to power up your individual and team notetaking using Microsoft OneNote so you never lose track of a meeting action item again in Taking meeting notes and creating tasks using Microsoft OneNote.
- We will explore the tools available in Microsoft Teams to create and manage tasks, including the new Microsoft Teams Planner app in "Managing and creating Tasks in Microsoft Teams and the Planner app".
- In the final article, we will put all the skills we've learned together and look at how to use the Microsoft To Do application to organize and plan your individual tasks–including a look into how I use these tools on a daily basis–in "Putting it all together to organize your daily workflow with Microsoft To Do".