

Is your document accessible to all people who might use it? If not, how can that be remedied? Attend this quick webinar to get an overview on creating accessible documents.
About this session
- Facilitator: Tom Mason
- Support: Jason Fickel, Jackie Griesemer, April Law
- Duration: (?) minutes (?) seconds
- Audience: IU instructors, staff, and students
Getting started with creating accessible documents
Description of the video:
Transcript hereAccessible Work Documents
Is your document accessible to all people who might use it? If not, how can that be remedied? Attend this quick webinar to get an overview on creating accessible documents.
This session will present three things:
- A metaphor—Why is accessibility important?
- A game—Can you spot the difference?
- A process—How do I create an accessible document?
1. A metaphor—Why is accessibility important?
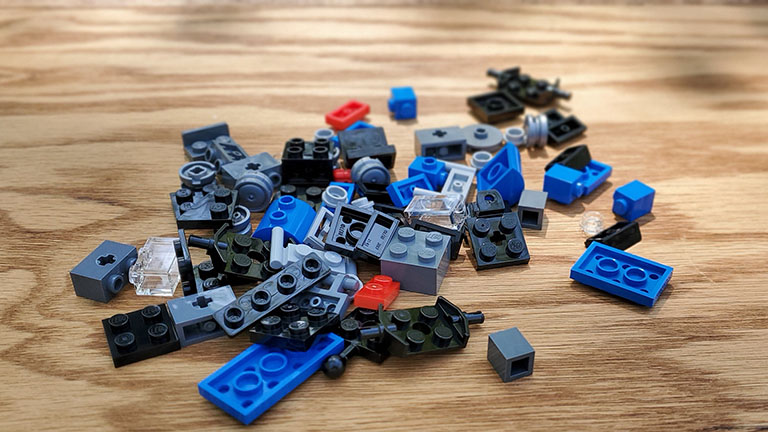
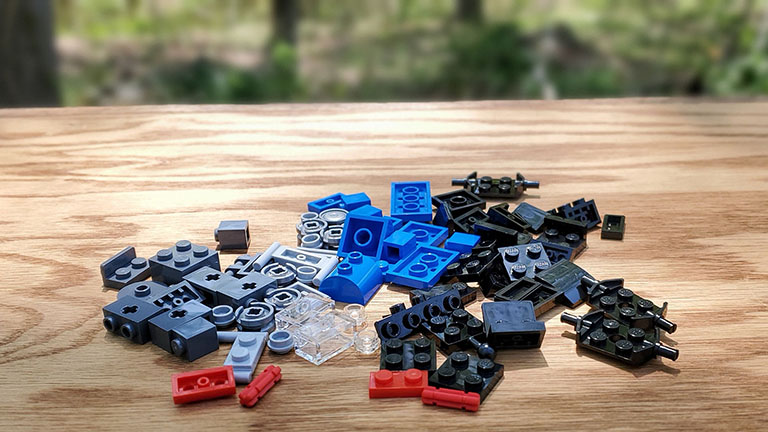
Imagine a pile of Lego bricks. Looking at the pile, you can't discern what the bricks are for: is this a house? A robot? Maybe it's a race car or a catepillar.
This pile of bricks represents an inaccessible document; any meaning, structure, or usefulness must be created by the observer of the pile.
Now imagine if every document you try to use is this jumble of bricks. This is what it's like for people who rely on assistive technology to use documents at work. This is a problem that everyone can address with little-to-no additional work when creating documents.
This webinar introduces some of the methods and techniques that will help consumers of your documents make sense of the unorganized pile of Lego bricks.
2. A game—Can you spot the difference?
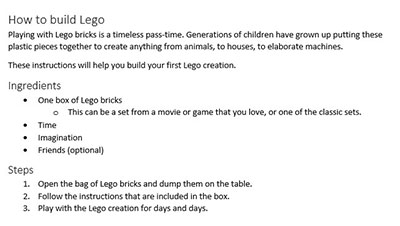
Here is a screencap of two documents. Visually, both look identical, but can you spot the difference?
Filename: Document.docx
Filename: How to build Lego.docx
It's hard to see without digging into the structure of the document (or trying to listen to or navigate this document using a screen reader).
The first document is structurally similar to a pile of Lego bricks. It's basically a string of characters with no structure.
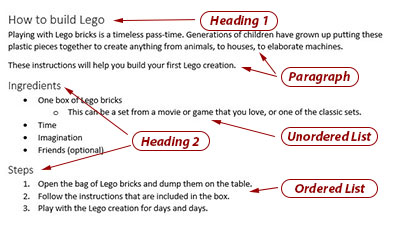
The second document is a fully-built Lego creation; there are headings, paragraphs, lists, and the document name conveys meaning.
Filename: Document.docx
Filename: How to build Lego.docx
To be fair, the first document is a slightly improved pile of bricks; Microsoft Word doesn't allow you to create plain text (e.g. without paragraphs).
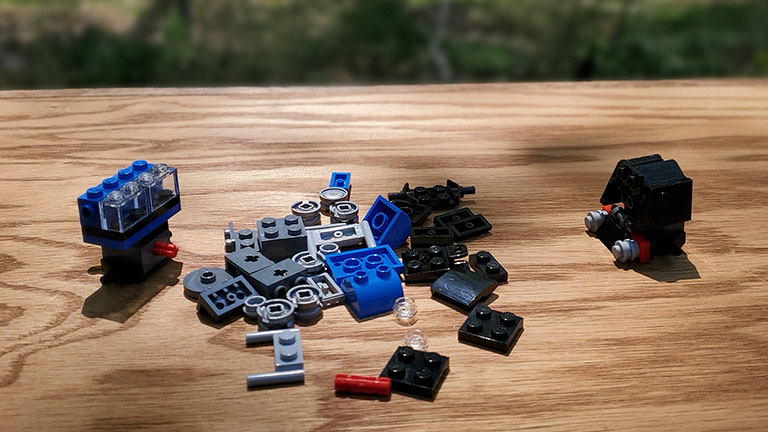
This sorted pile of bricks represents the first document. The parts are all still there, but they're organized by color and situated in a way that you can more easily see most of the parts of the document.
The sorted bricks make it easier to see the parts, but there's still no structure.
3. A process—How do I create an accessible document?
Creating an accessible document is directly tied to how you use Microsoft Word (to learn more about using Microsoft Word, consider enrolling in the self-paced course Word: The Basics). In our example today, we will use some instructions for building a Lego house as our example. In plain text, the content looks like a long paragraph or a long block of text:
An example of how a screen reader interprets plain text
            How to build a Lego house.
            Warning: Choking hazard - small marts. Not for young children.
            These instructions are written for people ages 8 and up. The builder should be able to build a house using the materials listed under the supplies section. This task should take a builder approximately 20 minutes to complete.
            Supplies
            1 - Lego door
            1 - large square base (16x16 should work)
            4 - thin square base blocks (8x8 should work)
            12 - Lego cube bricks (2x2)
            6 - Lego long rectangle bricks (2x8)
            16 - Lego medium rectangle bricks (2x6)
            36 - Lego standard rectangle bricks (2x4)
            1 - Lego minifigure (optional)
            Instructions
            Start by placing the square base on the table.
            Attach one 2x4 brick on each corner of the base. The long edges of the bricks should be parallel to each other.
            Place one 2x2 brick next to the short edge of the 2x4 bricks on one side of the square base.
            Attach the Lego door in the 2x4 space between the 2x2 cubes.
            Add 2x2 bricks on top of the other 2x2 bricks until they are the same height as the Lego door (5 additional bricks on each side of the door, six total).
            Add 2x4 bricks on top of the existing 2x4 bricks so they are the same height as the door (5 additional bricks on each 2x4 brick).
            Place the 2x8 bricks (all 6 stacked on top of each other) between the 2x4 brick stacks on the side of the base opposite the door.
            On the unbuilt sides, place 2 stacks of 6 of the 2x6 bricks side-by-side to fill the gap.
            On the top of the house, place one 8x8 building base on each corner to complete the house.
This document is analogous to our pile of unsorted bricks; the content is all there, but it's super difficult for assistive software and sighted users to glean any meaning from the content. If you copy and paste that chunk of text into Microsoft Word, it becomes analogous to the sorted pile of bricks. Microsoft Word adds paragraphs where it detects line breaks making the content a marginally easier to consume with a screen reader or with sight:
An example of plain text pasted directly into Microsoft Word
How to build a Lego house.
Warning: Choking hazard - small marts. Not for young children.
These instructions are written for people ages 8 and up. The builder should be able to build a house using the materials listed under the supplies section. This task should take a builder approximately 20 minutes to complete.
Supplies
1 - Lego door
1 - large square base (16x16 should work)
4 - thin square base blocks (8x8 should work)
12 - Lego cube bricks (2x2)
6 - Lego long rectangle bricks (2x8)
16 - Lego medium rectangle bricks (2x6)
36 - Lego standard rectangle bricks (2x4)
1 - Lego minifigure (optional)
Instructions
Start by placing the square base on the table.
Attach one 2x4 brick on each corner of the base. The long edges of the bricks should be parallel to each other.
Place one 2x2 brick next to the short edge of the 2x4 bricks on one side of the square base.
Attach the Lego door in the 2x4 space between the 2x2 cubes.
Add 2x2 bricks on top of the other 2x2 bricks until they are the same height as the Lego door (5 additional bricks on each side of the door, six total).
Add 2x4 bricks on top of the existing 2x4 bricks so they are the same height as the door (5 additional bricks on each 2x4 brick).
Place the 2x8 bricks (all 6 stacked on top of each other) between the 2x4 brick stacks on the side of the base opposite the door.
On the unbuilt sides, place 2 stacks of 6 of the 2x6 bricks side-by-side to fill the gap.
On the top of the house, place one 8x8 building base on each corner to complete the house.
Microsoft Word automatically turns individual lines of content into paragraphs. EAch line of the instructions for building a Lego brick house is now its own paragraph.
Now, let's start adding some structure; let's start turning the pile of sorted bricks into the final product!
Use the proper structure
When using a document, sighted consumers rely on visual cues throughout the document: large bold headings, lists with bullet characters, whitespace between chunks of text. These are the cues that indicate paragraphs, sections, and collections of statements. These visual cues are not available to someone using assistive technology. When we create digital documents, it's important that we create a structural scaffold around text.
This scaffold is crucial for someone using assistive software. It becomes difficult and onerous for someone using a screen reader to navigate a document that doesn't adequately supply this structure.
The first thing that we can do to make a document accessible is to identify parts of the document by their function, not by how they look. Let's start by understanding lists.
Creating lists
There are two types of lists: an ordered list and an unordered list. Ordered lists are series of items that have a specific order. These are commonly referred to as numbered lists. For example, the instructions in our Lego house building guide are an ordered list because they represent steps that must occur in a specific sequence.
An unordered list is a series of items that have no intrinsic order. These are often referred to as bulleted lists. For example, the supplies list in our Lego house recipe are an unordered list. To build the house, you don't need to organize the bricks in any order; they are unordered by nature.
Let's see how to create lists in Microsoft Word.
- Select the text to be made into a list.
- Select the appropriate list icon in the paragraph tools group on the Home tab of the ribbon (the "bullets" button for unordered lists and the "numbering" button for unordered lists).
Adding lists to the document give the document some more structure. The content that was once a series of paragraphs is now represented by an unordered (bulleted) list and an ordered (numbered) list:
An example of the instructions document with lists added
How to build a Lego house.
Warning: Choking hazard - small marts. Not for young children.
These instructions are written for people ages 8 and up. The builder should be able to build a house using the materials listed under the supplies section. This task should take a builder approximately 20 minutes to complete.
Supplies
- 1 - Lego door
- 1 - large square base (16x16 should work)
- 4 - thin square base blocks (8x8 should work)
- 12 - Lego cube bricks (2x2)
- 6 - Lego long rectangle bricks (2x8)
- 16 - Lego medium rectangle bricks (2x6)
- 36 - Lego standard rectangle bricks (2x4)
- 1 - Lego minifigure (optional)
Instructions
- Start by placing the square base on the table.
- Attach one 2x4 brick on each corner of the base. The long edges of the bricks should be parallel to each other.
- Place one 2x2 brick next to the short edge of the 2x4 bricks on one side of the square base.
- Attach the Lego door in the 2x4 space between the 2x2 cubes.
- Add 2x2 bricks on top of the other 2x2 bricks until they are the same height as the Lego door (5 additional bricks on each side of the door, six total).
- Add 2x4 bricks on top of the existing 2x4 bricks so they are the same height as the door (5 additional bricks on each 2x4 brick).
- Place the 2x8 bricks (all 6 stacked on top of each other) between the 2x4 brick stacks on the side of the base opposite the door.
- On the unbuilt sides, place 2 stacks of 6 of the 2x6 bricks side-by-side to fill the gap.
- On the top of the house, place one 8x8 building base on each corner to complete the house.
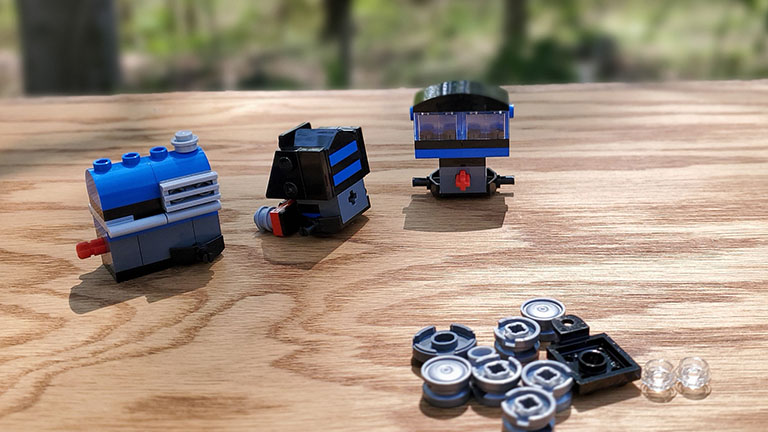
At this point, we have created a little bit of structure, but there's still a long way to go. To relate this back to our Lego metaphor, we have created a few pieces of the project, but the end product is still largely ambiguous:
We can start seeing some structure in our document and in our Lego project, but there's still a lot to do. Next, let's add some headings.
Creating headings
Headings are pieces of text that designate individual sections in a document. Headings are the large, bold pieces of text that sighted users rely on to navigate a document. They are also the structural pieces that allow assistive software to navigate a document.
- To designate a heading, select the text to become the heading.
- In the styles group on the Home tab of the ribbon, select the appropriate heading style (the Heading 1 button, the Heading 2 button, etc.).
It's critical to use the styles group in Word instead of just changing the paragraph properties to make the text larger and more bold. Simply changing visual display of the text does not convert that text into a heading.
Our document is now a collection of paragraphs and lists, organized by headings:
An example of the instructions document with headings added
How to build a Lego house.
Warning: Choking hazard - small marts. Not for young children.
These instructions are written for people ages 8 and up. The builder should be able to build a house using the materials listed under the supplies section. This task should take a builder approximately 20 minutes to complete.
Supplies
- 1 - Lego door
- 1 - large square base (16x16 should work)
- 4 - thin square base blocks (8x8 should work)
- 12 - Lego cube bricks (2x2)
- 6 - Lego long rectangle bricks (2x8)
- 16 - Lego medium rectangle bricks (2x6)
- 36 - Lego standard rectangle bricks (2x4)
- 1 - Lego minifigure (optional)
Instructions
- Start by placing the square base on the table.
- Attach one 2x4 brick on each corner of the base. The long edges of the bricks should be parallel to each other.
- Place one 2x2 brick next to the short edge of the 2x4 bricks on one side of the square base.
- Attach the Lego door in the 2x4 space between the 2x2 cubes.
- Add 2x2 bricks on top of the other 2x2 bricks until they are the same height as the Lego door (5 additional bricks on each side of the door, six total).
- Add 2x4 bricks on top of the existing 2x4 bricks so they are the same height as the door (5 additional bricks on each 2x4 brick).
- Place the 2x8 bricks (all 6 stacked on top of each other) between the 2x4 brick stacks on the side of the base opposite the door.
- On the unbuilt sides, place 2 stacks of 6 of the 2x6 bricks side-by-side to fill the gap.
- On the top of the house, place one 8x8 building base on each corner to complete the house.
At this point, our document is almost completely structured. In this state, the document is completely accessible. There are a few things that we can do to make the document more usable.
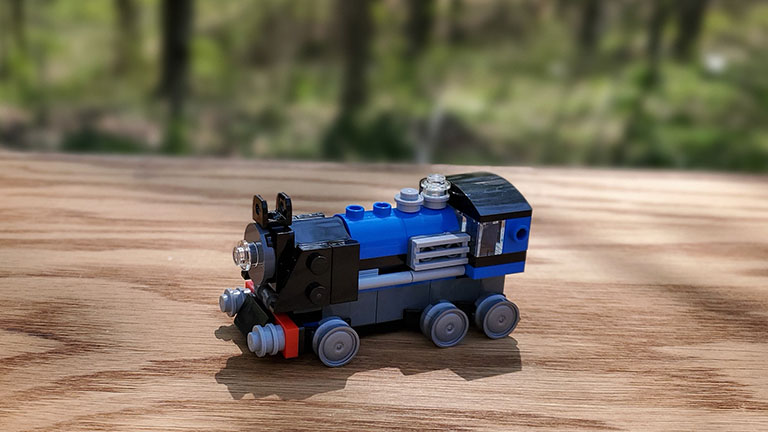
If we were to relate our document to the Lego project, it is mostly built. There are just a few pieces that aren't in their place—and the whole project isn't fully assembled—but we can tell that it could be a car, a train, or some other kind of vehicle in micro-scale:
Other text formatting
Other text formatting that you may wish to include is fine as long as you're using the appropriate tools in Microsoft Word to add that formatting. Text is often made bold, italic, or underlined to indicate emphasis. Our instructions have a warning at the top that we could emphasize by making the text bold. Not only does it make the text appear differently, but it marks the text as different to screen readers.
- To begin making text bold, select the text.
- To make text bold, in the Font group on the Home tab of the ribbon, select the Bold button (ctrl-b).
Our nearly-finished document is mostly unchanged. The difference is that the warning paragraph is now bold:
An example of the instructions document with a bold warning
How to build a Lego house.
Warning: Choking hazard - small marts. Not for young children.
These instructions are written for people ages 8 and up. The builder should be able to build a house using the materials listed under the supplies section. This task should take a builder approximately 20 minutes to complete.
Supplies
- 1 - Lego door
- 1 - large square base (16x16 should work)
- 4 - thin square base blocks (8x8 should work)
- 12 - Lego cube bricks (2x2)
- 6 - Lego long rectangle bricks (2x8)
- 16 - Lego medium rectangle bricks (2x6)
- 36 - Lego standard rectangle bricks (2x4)
- 1 - Lego minifigure (optional)
Instructions
- Start by placing the square base on the table.
- Attach one 2x4 brick on each corner of the base. The long edges of the bricks should be parallel to each other.
- Place one 2x2 brick next to the short edge of the 2x4 bricks on one side of the square base.
- Attach the Lego door in the 2x4 space between the 2x2 cubes.
- Add 2x2 bricks on top of the other 2x2 bricks until they are the same height as the Lego door (5 additional bricks on each side of the door, six total).
- Add 2x4 bricks on top of the existing 2x4 bricks so they are the same height as the door (5 additional bricks on each 2x4 brick).
- Place the 2x8 bricks (all 6 stacked on top of each other) between the 2x4 brick stacks on the side of the base opposite the door.
- On the unbuilt sides, place 2 stacks of 6 of the 2x6 bricks side-by-side to fill the gap.
- On the top of the house, place one 8x8 building base on each corner to complete the house.
There are two more topics to discuss to really polish our project.
Adding images
Images add visual interest to a document, but some users can't see the images. All images added to Microsoft Word should have short, descriptive alternative text (alt text) added to them.
- To add alt text to an image in Word, select the image.
- To edit the alt text, right-click (shift-F10) the image, select Edit Alt Text (press a).
- To save the alt text, simply de-select the image (press esc).
Using color
Some people reading your document might have trouble differentiating the contrast between two different colors. This is especially important to consider when you are creating a document that uses color to add visual appeal. In general, color should be used sparingly in a document. For more information, see the Use color sparingly section of the General guidelines for creating accessible documents article on the IU Knowledge Base.
Our document now has an image at the top with appropriate alternative text:
An example of the instructions document in its final state
How to build a Lego house.
Alt text for reference: A collection of Lego bricks on a table, ready to build something exciting! The bricks are blue, gray, black, and red.
Warning: Choking hazard - small marts. Not for young children.
These instructions are written for people ages 8 and up. The builder should be able to build a house using the materials listed under the supplies section. This task should take a builder approximately 20 minutes to complete.
Supplies
- 1 - Lego door
- 1 - large square base (16x16 should work)
- 4 - thin square base blocks (8x8 should work)
- 12 - Lego cube bricks (2x2)
- 6 - Lego long rectangle bricks (2x8)
- 16 - Lego medium rectangle bricks (2x6)
- 36 - Lego standard rectangle bricks (2x4)
- 1 - Lego minifigure (optional)
Instructions
- Start by placing the square base on the table.
- Attach one 2x4 brick on each corner of the base. The long edges of the bricks should be parallel to each other.
- Place one 2x2 brick next to the short edge of the 2x4 bricks on one side of the square base.
- Attach the Lego door in the 2x4 space between the 2x2 cubes.
- Add 2x2 bricks on top of the other 2x2 bricks until they are the same height as the Lego door (5 additional bricks on each side of the door, six total).
- Add 2x4 bricks on top of the existing 2x4 bricks so they are the same height as the door (5 additional bricks on each 2x4 brick).
- Place the 2x8 bricks (all 6 stacked on top of each other) between the 2x4 brick stacks on the side of the base opposite the door.
- On the unbuilt sides, place 2 stacks of 6 of the 2x6 bricks side-by-side to fill the gap.
- On the top of the house, place one 8x8 building base on each corner to complete the house.
Our document, while simple, is now accessible. All the building blocks are assembled in their appropriate places.
Oh, and I would be remiss if I didn't share with you the finsihed Lego project. It is a micro-scale steam engine!
Conclusion
We hoped you’ve enjoyed Getting started with creating accessible documents. To continue learning, you can enroll in the Word: The Basics or Creating Accessible Work Documents course.
Remember, all of IT Training’s online courses are available at no cost to everyone: staff, students, faculty, and members of the community. Each course will provide a certificate of completion and if you complete an entire series, you will also receive a series certificate.