

Kaltura provides a simple video editor that can be used to edit any video uploaded to Kaltura and is especially helpful when you need to edit parts of a Zoom meeting or Kaltura Capture recording. This video demonstrates how to use the Kaltura video editor to make simple edits to a video.
About this session
- Instructor: Beth Lynn Nolen
- Duration: 4 minutes 17 seconds
- Audience: IU instructors, staff, and students
Kaltura: Editing videos using the Kaltura Video Editor
Description of the video:
Kaltura provides a basic video editor that can be used to edit any video you've uploaded to Kaltura. This can be helpful when you need to edit out the start of a recorded Zoom meeting, or if you want to trim the beginning and end of a presentation you recorded using Kaltura Capture. In this video, I'll be demonstrating how to use the video editor to make some edits to a presentation I recorded previously. To get started, log into Kaltura if you aren't already, and go to your My Media page. From there, look for the video you want to edit, and click on the video's name to open it. Once the video's page loads, scroll down until you see the Actions menu - click on Actions, and in the drop-down menu that appears, click on Edit. When the edit page is loaded, to start editing the video, click on the Launch Editor button that's to the lower right side of the video's thumbnail. The video editor loads, and the interface is pretty simple. At the left side of the screen, you have a list of the media you're working with, and on the right side you have a preview of the video you're working with. At the bottom is the timeline, and this is where the editing happens. There are only a handful of options available for editing - you can indicate where the video should start and stop, and cut out sections of video to remove them. First, I'll demonstrate how to set the beginning and end of a video, which can be used to trim out unwanted content at the beginning and end of a video. To set the In and Out points, which will indicate where you want the video to start and end, respectively, in the timeline, move the playhead where you want to set the in or out point, then click the appropriate option in the toolbar above the playhead. Sometimes the preview in the editor will display an error, as you can see in the demonstration, making it so that video can't be played back - one way to remedy this is to save the changes made to your video as a copy so you still have the original to go back to, then exit the editor by clicking on the Exit button. It's also possible to continue editing without using the video preview - for the sake of time, that's what I'll do for this demonstration. Now, I'll demonstrate how to remove a section of video. First, move the playhead to the beginning of the section that you want to delete, and in the toolbar above the playhead, click the Split icon. Next, move the playhead to the end of the section you want to delete, and then click the Split icon again. Finally, click on the section you want to remove to select it, then click on the Delete icon. While this leaves a gap on the timeline, Kaltura will skip over the empty space and move from one section of video to the next when the video is saved. When you're finished editing, click on either the Save button or the Save A Copy button to save the video. Save a Copy preserves the original video and saves the changes as a new video, while Save overwrites the original video and replaces it with the edited version. For this demonstration, I'll click Save to save the video. When you click Save, a warning will appear, indicating that the changes you're about to make are permanent, and also that the save process may take a while. If you change your mind and want to save a copy at this point, click Cancel to go back, then click the Save a Copy button. Otherwise, you'll want to click Save. The Save process will take a while, especially with longer videos. You can leave the browser window or tab open and check its progress later. Once the video is saved, a dialog box will appear indicating the save was successful. Click OK to go back to the editor, then click the Exit button in the bottom left corner of the screen to exit the editor. Kaltura will bring you back to the My Media page, and if you want, you can open your newly edited video to view the changes you made. Now you know how to edit videos using the Kaltura video editor!Kaltura provides a basic video editor that can be used to edit any video you've uploaded to Kaltura. This can be helpful when you need to edit out the start of a recorded Zoom meeting, or if you want to trim the beginning and end of a presentation you recorded using Kaltura Capture.
Launching the Kaltura Video Editor
- Log in to https://kaltura.iu.edu with your username and passphrase.
- To open the My Media page, in the upper right corner of the Kaltura site, click your name, and in the menu that appears, click My Media.
- In the list of media that appears, click the name of the video you want to edit to load the video.
- On the video’s page, to access the edit options, underneath the video player, click Actions, and in the menu that appears, click
- To open the video editor, to the lower right side of the video player, click
 .
.
Using the video editor
The following diagram points out the essential parts of the Kaltura Video Editor interface:
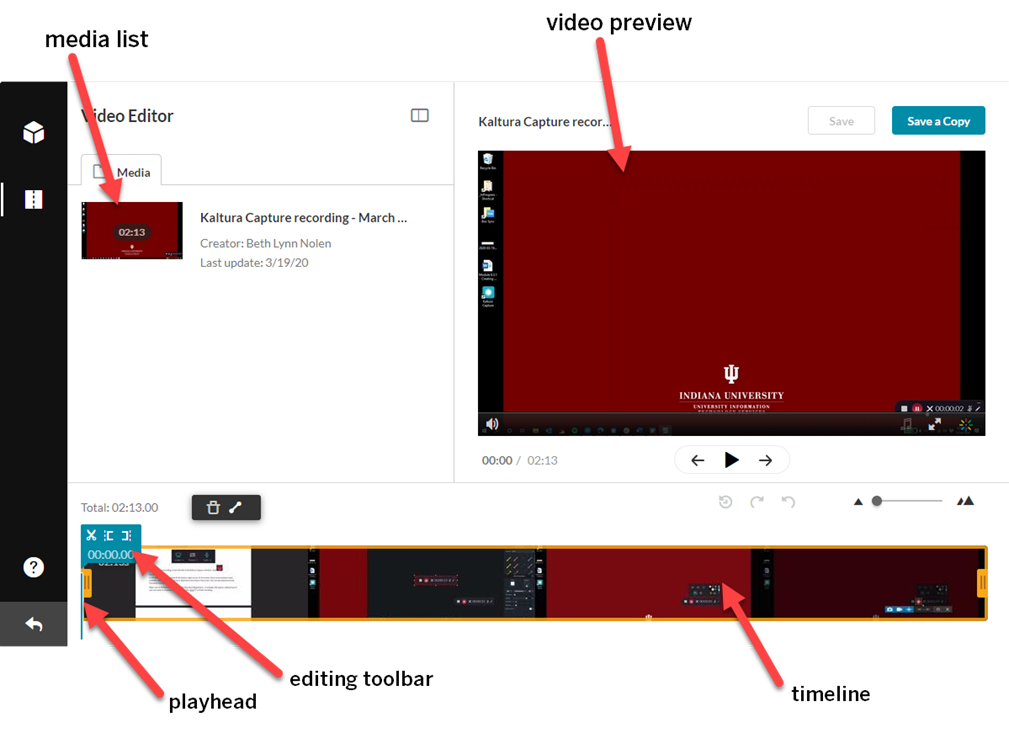
On the left side of the editor is the media list, and on the right side is the video preview. At the bottom of the editor is the timeline, which includes the playhead and the editing toolbar.
The following image shows the tools available in the editing toolbar in more detail:
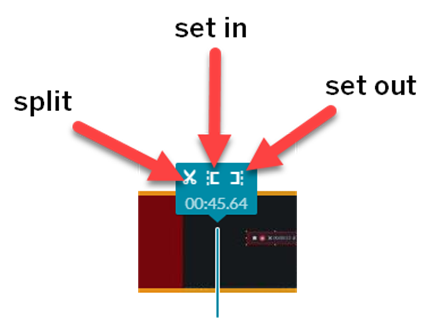
The editing toolbar is incorporated with the playhead, and offers the following options:
- Split: split the recorded footage into two separate clips.
- Set In: Set where the video should start.
- Set Out: Set where the video should end.
Removing part of a video
The following steps walk you through removing a section of video.
- Press and drag the playhead to the beginning of the section you want to delete.
- To split the clip at this point, in the toolbar above the playhead, click
 .
. - Press and drag the playhead to the end of the section you want to delete.
- Repeat step 2 to split the clip again.
- To delete the section of video, click on the section to select it, then in the toolbar above the timeline, click
 .
.
This will leave a gap on the timeline – however, Kaltura will skip over the empty space and move from one section of video to the next when the video is saved.
Setting the beginning and end of a video
The following steps walk you through setting the beginning and end of a video using the Set In and Set Out tools. This can be helpful if you have content at the beginning or end of a video you don’t want to include.
To Set In and Set Out, in the timeline, move the playhead where you want to set the beginning or end, then click either Set In (to set the beginning) or Set Out (to set the end).
Saving a completed video
When you're finished editing, click on either the Save button or the Save A Copy button to save the video. Save a Copy preserves the original video and saves the changes as a new video, while Save overwrites the original video and replaces it with the edited version.
When you click Save, a warning will appear, indicating that the changes you're about to make are permanent, and that the save process may take a while. If you change your mind and want to save a copy at this point, click Cancel to go back, then click the Save a Copy button.
The save process will take a while, especially with longer videos. You can leave the browser window or tab open and check its progress later.
Once the video is saved, a dialog box will appear indicating the save was successful. Click OK to go back to the editor, then click ![]() in the bottom left corner of the screen to exit the editor. If necessary, click I’m Sure to confirm you want to leave the editor.
in the bottom left corner of the screen to exit the editor. If necessary, click I’m Sure to confirm you want to leave the editor.